- Call 103 or 112 for an ambulance, or ask someone else to do it.
- Next you’ll need to perform CPR - cardiopulmonary resuscitation. This involves giving someone chest compressions and rescue breaths to keep their heart and circulation going.
- If they start breathing normally again, stop CPR and put them in the recovery position.
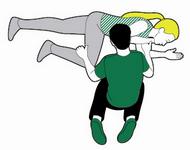
Step 4. Giving chest compressions
- Kneel down beside the casualty on the floor level with their chest.
- Place the heel of one hand towards the end of their breastbone, in the centre of their chest.


- Place the heel of your other hand on top of the first hand and interlock your fingers, making sure you keep the fingers off the ribs.
- Lean over the casualty, with your arms straight, pressing down vertically on the breastbone, and press the chest down by 5-6cm.
- Release the pressure without removing your hands from their chest. Allow the chest to come back up fully – this is one compression.
- Repeat 30 times, at a rate of about twice a second.
- Give two rescue breaths.
Step 5. How to give a rescue breath
- Ensure the casualty’s airway is open.
- Pinch their nose firmly closed.
- Take a deep breath and seal your lips around their mouth.
- Blow into the mouth until the chest rises.
- Remove your mouth and allow the chest to fall.
- Repeat once more.
Carry on giving 30 chest compressions followed by two rescue breaths for as long as you can, or until help arrives.
If the casualty starts breathing normally again, stop CPR and put them in the recovery position.
Text 3
| a self-contained breathing apparatus – изолирующий дыхательный аппарат а compressed air breathing apparatus - дыхательный аппарат, работающий на сжатом воздухе Full Face Mask – панорамная / полнолицевая маска Demand Valve [vælv] впускной клапан / клапанная коробка Air Сylinder Valve [ˈsɪlɪndə] клапан баллона с воздухом High Pressure Hose [həuz] шланг высокого давления Backboard – ложемент / спинодержатель Alarming Whistle – звуковое сигнальное устройство Pressure Gauge [geɪʤ] манометр Medium Pressure Hose – шланг среднего давления Pressure Reducer – редуктор давления Waist Band – поясной ремень Belt Buckle – пряжка поясного ремня Shoulder Strap Fastener – застежка плечевого ремня Quick Connect Coupling ['kʌplɪŋ] быстро соединяемое соединение Shoulder Strap – плечевой ремень fasten ['fɑːs(ə)n] закреплять, застёгивать handwheel [ˈhændwiːl] маховик (ручной) counterclockwise [ˌkauntə'klɔkwaɪz] против часовой стрелки head harness ['hed'hɑːnɪs] лямка actuate ['ækʧueɪt] включать; активировать venting [ˈventɪŋ] вентиляция preset [ˌpriː'set] заранее установленный seal [siːl] изоляция pressurize ['preʃ(ə)raɪz] герметизировать inhale [ɪn'heɪl] вдыхать audible leak ['ɔːdəbl] слышимая утечка expired [ɪk'spaɪəd] выдыхаемый exhalation valve [ˌeks(h)ə'leɪʃn] выдыхательный клапан |
HOW TO USE SCBA
A self-contained breathing apparatus (SCBA) sometimes referred to as a compressed air breathing apparatus (CABA), or simply breathing apparatus (BA), is a device worn by rescue workers, firefighters, and others to provide breathable air in an immediately dangerous to life or health atmosphere. 
Step 1. Lift cylinder with the cylinder valve on top and backplate facing the wearer and raise it over the head. Put on the SCBA on your shoulders like a backpack.
Step 2. Fasten the waist belt and tighten shoulder straps
Step 3. Open cylinder valve by turning handwheel slowly counterclockwise.
Step 4. Check pressure on the gauge.
Step 5. Open all facemask straps fully. Hold breath and place chin into the facemask and pull head harness and straps over the head and tighten all the strap so air won’ leak out your mask.
Step 6. Ensure mask is correctly placed on face with the nose guard on the nose and then tighten upper straps first and then lower ones. Both side straps must be tightened together
Step 7. Start to breathe deep which will actuate positive pressure and then breathe slowly.
Step 8. During venting observe gauge- whistle alarm should sound at preset pressure of 55 bar +/- 5 bar.
Step 9. When gauge indicates zero, hold breath. Face piece should hold onto face indicating positive seal.
Step 10. Open cylinder valve slowly, but fully to pressurize system. Inhale and hold breath. There should be no audible leak.
Step 11. Continue breathing. Expired air should easily flow out of exhalation valve.
Step 12. Press center of rubber cover on demand valve checking supplementary supply.
After Use
1. Press reset lever and switch off.
2. Press and hold down button and remove demand valve.
3. Insert finger behind neck strap and press buckles forward. Pull mask forward and then up and back over the head.
4. Close cylinder valve and remove face piece.
5. Unbuckle waist belt. Remove equipment when shoulder straps loosen.