Task 1. Prepare a bilingual glossary based on the terms and special. Translate the following text into Russian. Comment on the translation techniques you applied.
BUNKER HILL SAFES
Electronic Digital Safe
Installation and Operation Instructions
| TO PREVENT SERIOUS INJURY, READ AND UNDERSTAND ALL WARNINGS AND INSTRUCTIONS BEFORE USE |
Operation
To Open the S afe: Input the numbers “159” on the Electronic Key Pad, then press either the “A” or “B” Key. Once the Green light is on, turn the Knob and pull the Door open. Note: The knob must be turned within 5 seconds of the Green light coming on. If the knob is not turned, the entry code will need to be re-entered.
To Close: Close the Door and turn the Knob in the opposite direction. The Safe is now locked.
To C hange the C ode: The Safe comes preset with a default code of “159”. To change the Code, first follow the instructions for opening the Safe. On the inside of the Door toward the hinge, you will see a small Red Button. Press this Button until the Yellow Light on the Front Control Panel lights up. Now you can input the new Code (1 to 8 characters) into the Front Control Panel, followed by either the “A” or “B” Key. The Safe will beep twice to confirm that the Code has been changed.
Important: If the Safe beeps three times, then the Code has not been accepted, and you must repeat the steps above.
To Change the Batteries: If the Red Light and the Green Light are both lit at the same time, it is time to change the Batteries. Follow the instructions for opening the Safe. The Battery Compartment is located on the inside of the Door. Slide the Battery Cover off of the Battery Compartment, remove used Batteries, and insert four new “4, AA” Batteries. Once you have changed the Batteries, be sure to test the Code before you close the Door again.
U sing the E mergency Key:
a) The Safe comes with two Emergency Keys in case the code is forgotten or the batteries are dead. To override the electronic locking device, detach the Front Panel from the Safe. There is a sticker to the left of the keypad, with SKU # 45891 printed on it. Gently peel off that sticker. See Figure 1.
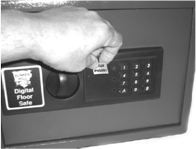
Figure 1.
b) Remove the screw under the sticker, as shown in Figure 2.

Figure 2.
c) Gently remove the Panel to reveal the Secret Key-Operated Lock. Insert Emergency Key into the Secret Key-Operated Lock and turn. Turn Knob and pull Door open. Replace the keypad and the sticker when finished. See Figure 3.
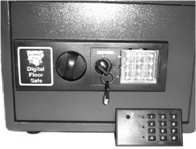
Figure 3.
IMPORTANT: NEVER LOCK THE EMERGENCY KEYS IN THE SAFE!
Installat i on
The safe has four concrete fasteners that are inside of the safe when you open it. There is also a mounting template included with the safe. Place the mounting template against the area you will be mounting the safe and tape it into place.
WARNING! Before drilling or driving nails, make sure there are no wires, cables or pipes in the path.
To attach the safe to a wood surface, hammer a nail (not included) to mark the hole placement. Drill an 1/8” diameter pilot hole into each mounting hole location. Place the safe over the mounting holes and secure the safe using four 1/4” diameter self-tapping screws (not included).
To use the concrete fasteners, drill a small pilot hole through the template to mark the hole placement. Next drill four holes in the correct location, using a concrete drill bit. Drill the holes the same diameter as the fasteners and 2” deep. Hammer the fastener in the hole with the flat side going into the hole first. Use a wood block between the bolt and the hammer to protect the threads.
Place the safe over the bolts (with the nut removed from the bolts) and tighten a nut onto each bolt. As you tighten the nuts onto the bolts, the fasteners will expand inside the cement, securing the safe into place.
Note: There are no replacement parts available for this product.
Task 2. Prepare a bilingual glossary based on the terms and special words. Translate the following text into Russian. Comment on the translation techniques you applied.
| PELTIER COOLER/HEATER PCH-1/PCH-2 Operating instructions | 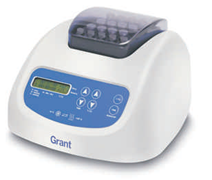
|
Сontents
1 Safety......................................................................................................................3
2 General Information...............................................................................................4
3 Getting started........................................................................................................5
4 Operation of PCH-1/2............................................................................................6
5 Maintenance...........................................................................................................8
6 Specifications.........................................................................................................9
7 Guarantee and service..........................................................................................10
Safety
The following symbols mean:
 Caution: Read these operating instructions fully before use and pay particular attention to sections containing this symbol.
 Caution: Surfaces can become hot during use.
 Use only as specified by the operating instructions, or the intrinsic protection may be impaired.
 After transport or storage in humid conditions, dry out the unit before connecting it to the supply voltage.
During drying out the intrinsic protection may be impaired.
Connect only to a power supply with a voltage corresponding to that on the serial number label.
Ensure that the mains switch and isolating device (power supply connector) are easily accessible during use.
Connect only to a power supply which provides a safety earth (ground) terminal.
Use only with the power supply provided or a replacement supplied by Grant.
Before moving, disconnect at the power supply socket.
If liquid is spilt inside the unit, disconnect it from the power supply and have it checked by a competent person.
It is the user's responsibility to carry out appropriate decontamination if hazardous material is spilt on or inside the equipment.
Use only standard and good quality tubes. Remember that thin-walls tubes have a higher thermoconducting factor;
Don't heat the tubes over the melting point of the material they are made of. Use thermoresisting polypropylene tubes.
Don't fill tubes more than 3-5 mm over the level they are immersed in the thermoblock;
Before using any cleaning or decontamination method except those recommended by the manufacturer, user should check with the manufacturer that the proposed method will not damage the equipment.
The unit has an air intake for cooling and ventilation. Do not block or impede the ventilation grille.
Clean the unit only with a damp cloth, do not use chemical cleaning agents.
2. General Information
Introduction
Peltier cooler/heater PCH-1/2 is designed for maintaining the set temperature, in the temperature range from -10°C to +100°C on the aluminum block with special sockets for tubes. The device can also be used for maintaining stable temperature in the room where the temperature is fluctuating, e.g. +20 ±0.1°C at room temperature (RT) changing from +18°C to +22°C.
PCH-1/2 has obvious advantages when, for example working with micro quantities of reagents used in the Eppendorf tubes.
The device can be used in:
• molecular and cell biology for sample cooling,
• biochemistry for enzyme processes analysis.